Help Center
Dashboard Cheat Sheet
The menu on the left side of the Dashboard has a new look. Everything you used before is still there, it just has a new home.
🖨️ Print the one-page Quick Guide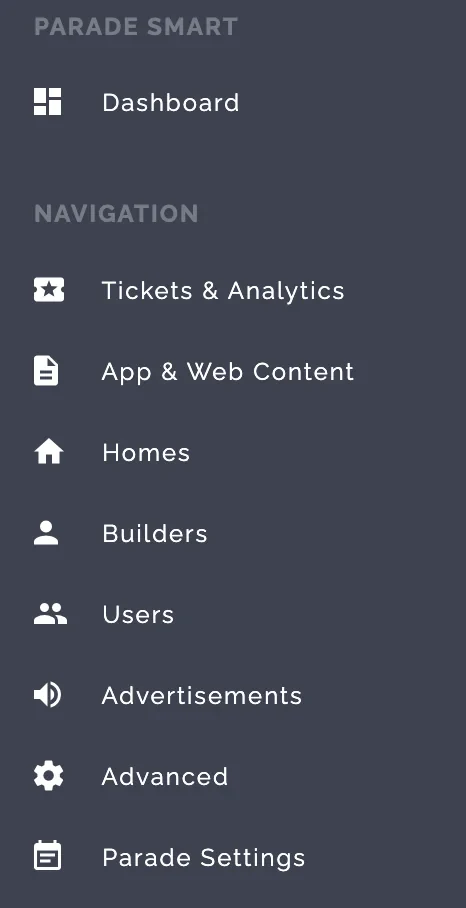
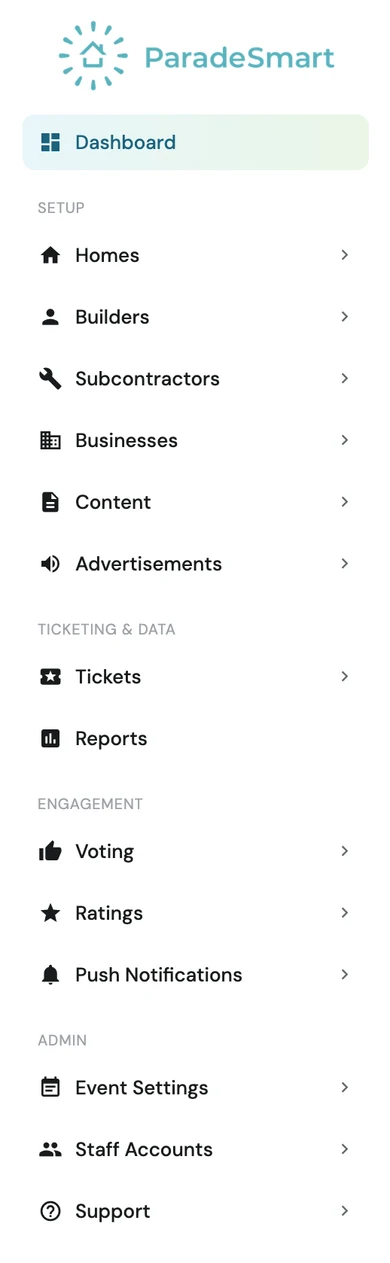
Below, find the part of the old menu you remember. Each one tells you where to click now, whether it's in the sidebar (the menu on the left) or a button on the page.
Can't find something? Check Advanced. Most things that moved came from the old Advanced menu.
Jump to Advanced
In the old Dashboard
Tickets & Analytics
This was one menu item. Now it's two: Tickets and Reports.
Your list of tickets
Click Tickets in the sidebar.
Reports
Click Reports in the sidebar.
The Reports button on the Tickets page still works too.
Ticket Types
Click Tickets in the sidebar. Then click Ticket Types right under it.
Transactions
Click Tickets in the sidebar. Then click Transactions right under it.
Export Ticket List and Import Tickets
Click Tickets in the sidebar. The buttons are at the top of the page.
In the old Dashboard
App & Web Content
This is now called Content.
Your website pages
Click Content in the sidebar.
In the old Dashboard
Homes
Your list of homes
Click Homes in the sidebar.
Adding a home
Click Add Home right under Homes in the sidebar, or the + Add Home button at the top right of the Homes list. Both open the same form.
Quick way: click the + Add Home button at the bottom of the Dashboard home screen.
Hiding a home (the old Hidden column is now Visible)
Click Homes in the sidebar. Switch Visible to No next to the home.
Hiding several homes at once
Click Homes in the sidebar. Then click the Hide All Homes button at the top.
Exporting your homes' information
Click Homes in the sidebar. Then click the Export button at the top.
Editing a home's details
Click Homes in the sidebar. Then click the pencil button next to the home. Its details are on the Edit Info tab.
Upload the main image and photos on the Preview tab. Add the home's subcontractors on the Subcontractors tab.
The Legacy Update Screen button
It's gone. Everything you did there, like changing a home's builder, is on the home's Edit Info tab now.
In the old Dashboard
Builders
Your list of builders
Click Builders in the sidebar.
Adding a builder
Click Add Builder right under Builders in the sidebar, or the + Add Builder button at the top right of the Builders list. Both open the same form.
Quick way: click the + Add Builder button at the bottom of the Dashboard home screen.
Setting a builder's password
Click Builders in the sidebar. Click the pencil button next to the builder and type a password in Change Password. Then click the Save button.
You can also do this in Staff Accounts. See Users below.
In the old Dashboard
Users
This is now called Staff Accounts.
Your list of users
Click Staff Accounts in the sidebar.
Builder accounts are here too, marked with a Builder tag.
Adding a staff account
Click Add Staff Account right under Staff Accounts in the sidebar, or the + Add Staff Account button at the top right of the Staff Accounts list. Both open the same form.
Setting a builder's password
Click Staff Accounts in the sidebar. Click the pencil button next to the builder (they have a Builder tag). Type the new password in New Password and Confirm New Password, then click the Save button.
You can also do this from Builders in the sidebar.
In the old Dashboard
Advertisements
Your list of ads
Click Advertisements in the sidebar.
Adding an ad
Click Add Advertisement right under Advertisements in the sidebar, or the + Add Advertisement button at the top right of the Advertisements list. Both open the same form.
Advertisement Areas (where ads show)
Click Advertisements in the sidebar. Then click the pencil button next to the ad. Switch the All areas toggle off, then choose where the ad shows on the website and app.
The Ads Report
Click Reports in the sidebar. Then click Advertisement Clicks on the Reports page.
In the old Dashboard
Advanced
The Advanced menu is gone. Everything that was in it now lives in the part of the sidebar it goes with.
Subcontractors
Click Subcontractors in the sidebar.
Quick way: click the + Add Subcontractor button at the bottom of the Dashboard home screen.
Available Jobs
These are called Trades now. Click Subcontractors in the sidebar. Then click Trades right under it.
Businesses
Click Businesses in the sidebar.
Quick way: click the + Add Business button at the bottom of the Dashboard home screen.
Tickets and Ticket Types
Click Tickets in the sidebar. Then click Ticket Types right under it.
Ticket Batches
This is called Printed Ticket Generation now. Click Tickets in the sidebar. Then click Printed Ticket Generation right under it.
Transactions
Click Tickets in the sidebar. Then click Transactions right under it.
Donations
Click Tickets in the sidebar. Then click Donations right under it.
Pages
Click Content in the sidebar. Your list of pages shows up.
Parade Menu Items (your app menu)
This is called App Menu now. Click Content in the sidebar. Then click App Menu right under it.
Traits (extra fields on your homes)
Click Homes in the sidebar. Then click Traits right under it.
Virtual tour fields (Video Tour and 360 Virtual Tour) aren't on homes by default. Add them here as traits, or email us and we'll add them for you.
Votes
Click Voting in the sidebar.
Voting Categories
Click Voting in the sidebar. Then click Voting Categories right under it.
Excluded Homes
Click Voting in the sidebar. Then click Excluded Homes right under it.
Ratings and Reviews
Click Ratings in the sidebar.
Rating Categories
Click Ratings in the sidebar. Then click Rating Categories right under it.
Contact Requests
Click Builders in the sidebar. Then click Contact Requests right under it.
Memberpoints
Click Builders in the sidebar. Criteria, Criterion Seasons, Deadlines, Deadline Seasons, Scores, Fulfillments, and Member Point Rankings are all right under it.
Only shows if your event uses the member points feature.
Users and Parade Visitors
Users are in Staff Accounts in the sidebar. Parade Visitors (everyone who registered a ticket) is in Reports in the sidebar. Click Visitors on the Reports page.
In the old Dashboard
Parade Settings
This is now called Event Settings. After any change here, be sure to click the Save Settings button.
Your event dates
Click Event Settings in the sidebar. Set Event Starts and Event Ends in the Event Dates section at the top. Then click the Save Settings button.
Ticket sales start
Click Event Settings in the sidebar. Set Ticket Sales Start in the Event Dates section at the top. Then click the Save Settings button.
No tickets can be bought before this date, even if a ticket type is turned on.
Plottable date (now called Addresses Go Live)
Click Event Settings in the sidebar. Set Addresses Go Live in the Event Dates section at the top. Then click the Save Settings button.
This is when home addresses and map pins show to the public. They stay up until the event ends. Leave it blank to show addresses right away.
Your event logo
Click Event Settings in the sidebar. Upload or swap it in the Logo section. Then click the Save Settings button.
We suggest a transparent PNG, so your logo doesn't show up with a box behind it.
Voting and awards settings
Click Event Settings in the sidebar. They're in the Voting / Awards section. Then click the Save Settings button.
Analytics and tracking code
Click Event Settings in the sidebar. Paste it in the Analytics / Tracking section. Then click the Save Settings button.
For Google Analytics, Google Tag Manager, Meta Pixel, and similar tools.
Switching to a previous event's data
Click the Change Event button at the top of the screen, or Change Event in the blue box in the sidebar. Then pick the event you want to switch to.
Switch back to this year before you change anything.
NEW In the Dashboard
These are brand new. You won't find them in the old Dashboard, so here's where each one lives.
New: Manage Tickets
Click Tickets in the sidebar. Then click Manage Tickets right under it.
Send the tickets from a big order on to each guest by name and email. Orders of 10 or more tickets show up here automatically.
New: Test Purchase Ticket link
Click Tickets in the sidebar. Then click the Test Ticket Sales Page button at the top.
New: Ad run dates
Click Advertisements in the sidebar. When you add or edit an ad, fill in Show from and Show until. The ad shows up and comes down on its own.
New: Home Stats
Click Homes in the sidebar. Then click Home Stats right under it.
Visits and scans for every home, with an Export button.
New: Push Notifications
Click Push Notifications in the sidebar.
Push notifications are an extra feature. To add them to your event, email support@paradesmart.com and we'll get you a quote.
New: Coming Soon screen in the app
Click Event Settings in the sidebar and turn on Coming Soon in the App. Then click the Save Settings button. To use your own wording, make a page with the URL /coming-soon/ under Content in the sidebar (Pages).
Shows a Coming Soon screen on the app's Homes pages instead of your homes. It turns itself off when Addresses Go Live passes.
New: Contacting us from the Dashboard
Click Support in the sidebar. Then click Contact Support right under it.
Your message comes straight to our inbox, so you don't have to write your own email.
The 10 things people ask about most
1. I want to give a builder their login
Click Builders in the sidebar. The list shows every builder's username. Click the pencil button next to the builder, scroll to Change Password at the bottom, and type a password. Click the Save button. Then share the username and password with your builder.
Passwords can't be viewed later, even by our team. If a builder forgets theirs, just set a new one. More on builder logins
2. I want to add or update a home
To add a new home, click Add Home right under Homes in the sidebar, or the + Add Home button at the top right of the Homes list. Every home needs a name, an Index, and a builder. To change a home, click Homes in the sidebar, then the pencil button next to it. Its details are on the Edit Info tab. Make your changes, then save.
No builder yet? You can add one right on the Add Home page, under the Builder field. Quick way: click the + Add Home button at the bottom of the Dashboard home screen.
3. I want to set when my event, ticket sales, and addresses go live
Click Event Settings in the sidebar. In the Event Dates section, pick the date and time for Event Starts, Event Ends, Ticket Sales Start, and Addresses Go Live (when addresses and map pins show). Click the Save Settings button.
No tickets can be bought before Ticket Sales Start, even if a ticket type is turned on. All times are Mountain Time.
4. I want to add or update a builder
To add a new builder, click Add Builder right under Builders in the sidebar, or the + Add Builder button at the top right of the Builders list. To change one, click Builders in the sidebar, then the pencil button next to it. Fill in the builder's Name (usually their business name) and anything else you have, like their logo. Click the Save button at the bottom of the form.
Name is the only thing a builder needs. Everything else is optional. Quick way: click the + Add Builder button at the bottom of the Dashboard home screen.
5. I want to fix a map pin or wrong directions
Click Homes in the sidebar, then the pencil button next to the home. Click the Edit Info tab. Move the pin to the exact spot of the home. Click the Save button.
For the most accurate pin, use the home's exact latitude and longitude. Our GPS Coordinates & Map Pins guide shows the easiest way to get them. New road the maps don't know yet? Move the pin to the closest street they do know, and add written directions in the Directions field.
6. I want to hide a home until it's ready
Click Homes in the sidebar. Switch Visible to No next to the home. Switch it back to Yes when it's ready.
7. I want to log in or reset a password
Go to app.paradesmart.com/manage and log in. To reset someone's password, click Staff Accounts in the sidebar, then the pencil button next to them. Type the new password in New Password and Confirm New Password, then click the Save button.
Locked out yourself? Email support@paradesmart.com and we'll reset it.
8. I want to resend someone's tickets
Click Tickets in the sidebar. Search for their name or email, then click the ticket number. Click the Resend Email button. It sends the same ticket email again to the address the ticket is registered to.
Ask them to check their spam folder first. Big order? On the ticket record, click Send Tickets to Recipients to send each guest their own ticket by name and email. More on lost tickets
9. I want to add a sponsor banner ad
Click Add Advertisement right under Advertisements in the sidebar, or the + Add Advertisement button. Upload the ad image (1200 × 200 pixels) and add the sponsor's website link. Choose where the ad shows and the dates it runs, then click the Save button.
10. I want to see how many people attended our event
Your total scans and re-entries show in the quick stats on the Dashboard home screen, right when you log in. For more detail, click Reports in the sidebar, then click Scanned Tickets on the Reports page. Pick your event's start and end dates, then click the Change Date button. Ticket usage at the top shows the share of tickets scanned at least once, and each home's card shows its visits.
For the number of tickets used and how many homes each person toured, click Homes Visited per Ticket on the Reports page.