Getting Started with ParadeSmart
Everything a new client needs to get up and running — from your first login to your first published parade.
⏱ About 8 min readNew Client Checklist
Welcome to ParadeSmart. Complete these steps in order and you'll have a working event ready to preview before your parade season begins.
-
1Fill out your three setup forms
These forms give our team everything needed to build your event. Links are in the Setup Forms section below.
-
2Log in to Web Manager
We'll send you your username and password when your account is created. Go to app.paradesmart.com/manage to get started.
-
3Configure your Parade Settings
Set your event start/end dates, ticket sales start date, and the Plottable Date for map visibility.
-
4Add your builders and homes
Enter builder profiles first, then add their homes with accurate GPS coordinates for the map.
-
5Set up ticketing
Connect your payment processor, create ticket types, and configure pricing. See the Ticketing Guide for full details.
-
6Test before you launch
Log in with a builder account, test the map, do a test scan, and purchase a test ticket. Catch issues now so event day is smooth.
This guide covers a lot of ground. Search for any term — "voting," "CSV," "Stripe" — to jump directly to what you need.
Setup Forms
The New Event Form is the one we ask every client to fill out for each new event. If you're also using our website or ticketing services, just fill out those forms too and we'll get everything configured on our end!
Even if most details stay the same, please submit the forms again each year so we have the current information on file.
Logging into Web Manager
The Web Manager is your control center for everything in ParadeSmart — homes, tickets, ads, reports, and more. Bookmark it now.
If you've never had a Web Manager account set up, email support@paradesmart.com and we'll get one created for you. Forgot your password on an existing account? Email us and we can reset it — for security reasons, no one, including our team, can look up or recover an existing password.
The same username and password you use for the Web Manager will log you into the admin side of your ParadeSmart app.
Previous event data, builder profiles, and homes should never be deleted, even if they're no longer active. Old data is used for historical reports and can be referenced when setting up future events. Use the "Hidden" toggle to remove something from public view instead.
Accessing Previous Year Data
You can switch between event years in the Web Manager to access previous reports, review old content, or compare data.
-
1Go to Web Manager
Log in at app.paradesmart.com/manage
-
2Click "Change Event" at the top of the screen
Select a different event by date to switch to that year's data.
-
3Use the manager as normal
View reports, check old ticket data, or review previous content.
-
4Switch back before making edits
This is critical — the manager will stay on the previous year even if you close and reopen the browser. Always confirm you're in the correct year before saving any changes.
Edits made in the wrong event year cannot be undone by our team. Check the banner at the top of the manager that shows your active event name and start date before making changes.

Parade Settings Overview
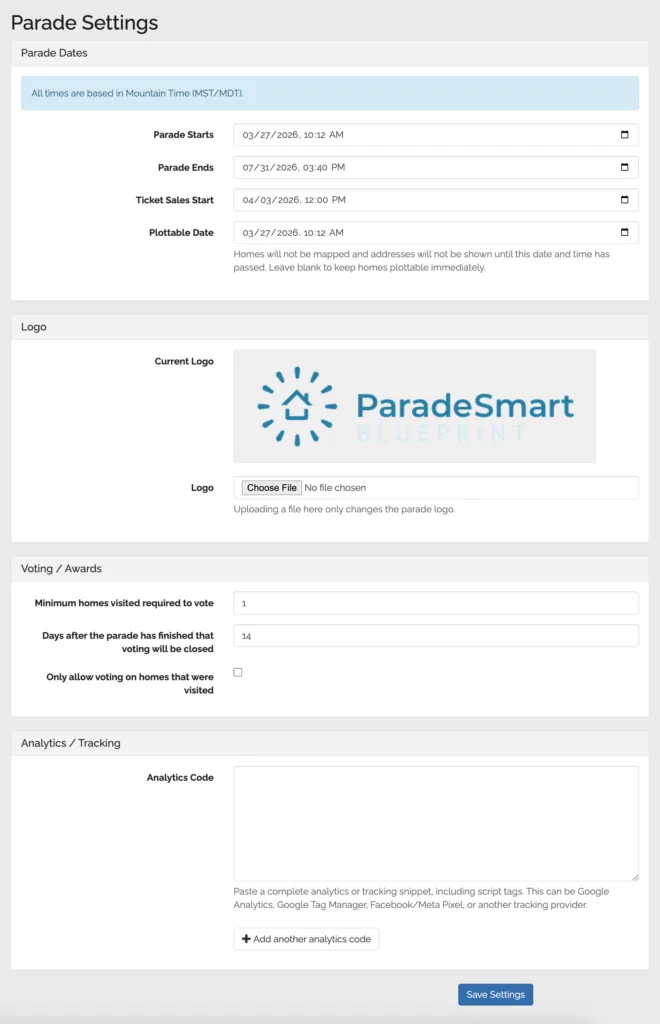
Parade Settings control how your event appears and behaves throughout the platform. Access them by clicking Parade Settings in the left-hand sidebar of the Web Manager.
| Setting | What it controls |
|---|---|
| Parade Start & End Dates | When your parade officially begins and ends in the system. |
| Ticket Sales Start Date | When online ticket sales become available to the public. |
| Plottable Date | When homes become visible on the map and addresses are shown publicly. Useful for testing the map before launch without exposing addresses early. If left blank, homes are visible as soon as they're published. |
| Logo Upload | Upload or replace your parade logo. Updates across the app and dashboard immediately. |
| Voting & Awards | Set the minimum number of homes a visitor must visit before voting, how long voting stays open after the parade, and whether to restrict votes to only visited homes. |
| Analytics Tracking | Paste a complete analytics snippet here — Google Analytics, Google Tag Manager, Meta Pixel, or similar. Supports multiple tracking codes. |
ParadeSmart servers are located in Utah. All date and time settings use Mountain Time. Adjust accordingly if your parade is in a different time zone.
Adding Builders & Homes
Builder profiles and homes are the core of your parade listing. Add builders first, then add their homes underneath each builder.
Make sure each builder profile has at least one of these before the parade goes live.
Step-by-step: Adding Builders & Homes
If you need to remove a builder, be aware that all homes linked to that builder will be deleted along with the profile. Check all connections before deleting. Use the "Hidden" toggle to remove something from public view without permanently deleting it.
Builder logins
Builder login accounts are created automatically when you add a builder — you do not need to create them manually. To activate a builder login, go to the Users tab, search for the builder's name, click Edit, and set a password. Share the username and password with your builder or their staff.
Go to the Homes tab, find the home, click Preview, scroll to the bottom, and click Advanced Options. This shows the builder administrator linked to that home, which you can click to go directly to the user account.
Domain & DNS Setup
To connect your custom domain to your ParadeSmart website, you'll need to add two DNS records in your domain registrar's control panel (GoDaddy, Namecheap, Cloudflare, etc.).
DNS records to add
| Type | Host / Name | Value / Points To | TTL |
|---|---|---|---|
| A | @ (or leave blank) | 104.236.213.202 | 1 hour (3600) |
| CNAME | app | [your-domain.com] | 1 hour (3600) |
Replace [your-domain.com] in the CNAME row with the target hostname provided by the ParadeSmart team.
Step-by-step instructions
- 1Log in to your domain registrar
Go to GoDaddy, Namecheap, Google Domains, Cloudflare, or wherever your domain is registered.
- 2Open DNS Management
Look for a section labeled DNS, DNS Management, DNS Settings, or Advanced DNS.
- 3Add the A Record
Type:
A· Host:@· Value:104.236.213.202· TTL: 1 hour - 4Add the CNAME Record
Type:
CNAME· Host:app· Value: [hostname from ParadeSmart team] · TTL: 1 hour - 5Remove conflicting records
If an existing A record for
@points to a different IP, delete it. Do not remove MX or other unrelated records. - 6Save and wait
DNS changes take 15 minutes to 48 hours to propagate fully. Check status at whatsmydns.net.
Confirm the A record IP is exactly 104.236.213.202 with no extra spaces. Confirm the A record Host is @ or blank — not www. Confirm the CNAME Host is app only. Contact our support team if issues persist.